Creating a Calendar Entry (Meeting) and building the Meeting Pack
- There are two ways to create a Calendar event (meeting)
a) In the Calendar - either double click on a date or click on ‘New Event’.
b) From any folder - use Actions/New Event - Complete the event title, time, date, board/committee and the description box (optional).
You MUST also complete the “Show in the following folder” selection (this will be pre-populated if the meeting was created from a folder). When you see the screen showing the available folder locations that you can select, navigate to the relevant Meeting folder, select it, and then click OK.
Note: The chosen folder must have already been created - normally there will be folders for Board/Committee meetings and it is a good idea to have a general 'School events' folder for anything that is open to everybody - see SCHOOL EVENTS for more information
The meeting pack will now be viewable from the Calendar entry and also through the Folder you have chosen. If the Folder you have selected is a ‘restricted access’ folder then the Calendar event will also be restricted in the same way.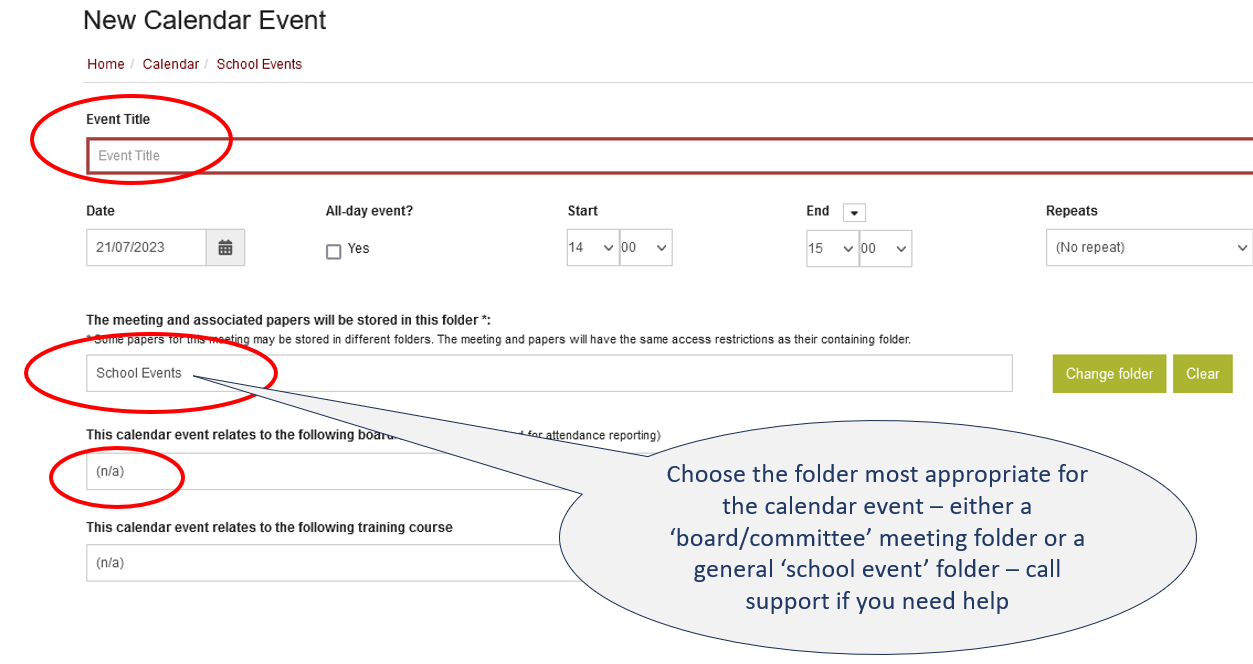
-
Click on “Add new Files to GVO and create Links” or “Add Link to files already in GVO” – adding a link to the meeting pack points to a document already stored in the GVO and will avoid duplication of files – this is good information management practice.
NOTE: Whilst you can add the files and create links in one step we do recommend that adding the files into the correct folders first can avoid mistakes and eventually be quicker. So, you would add each paper into the correct folder (Agendas in Agenda, Minutes in Minutes, Reports in Reports etc - this makes finding them later MUCH easier.Adding Files and Creating Links
To add new files to GVO and create links in the pack here are the steps (although we do suggest that adding the files first and then creating the links can make life easier) ...
a) Select the add new files button and select the items from your device...
b) For each item decide the 'type' of document you are adding - a simple 'file', a file with approvals available or a policy...
c) For each file select where it will be stored (the default folder will be the same as the meeting) - you may have a suitable folder for agendas, minutes, reports and policies.
d) Decide on the meeting pack title for each document...
The document name in the chosen folder will be same as the name in this box. If you wish to change the filename in the folder that can be done and will not affect the title of the link in the meeting pack.
Note: If any file needs to be restricted (eg Part 2 Minutes) then you will need to go to the document in the folder to add those restrictions or better still add the document directly to the folder with the restrictions in place and then just create a link from the pack. - Add links to Files already in GVO using the appropriate button (Add links to files already in GVO), typing a suitable Title for each document (two digit numbering will ensure that the meeting pack is in the correct order for the meeting agenda when the calendar entry is viewed).
Follow the same process, regardless of the file type. Note that when the meeting pack is saved the agenda items will be sorted alphabetically - by adding numbering before each item (eg 01, 02, 03 etc) then the agenda items can match the agenda (always use two digit numbering otherwise 10 will come before 2!) - Screenshot below shows the way the screen will look when several links to different documents in the GVO have been added. The buttons allow you to add more links to existing documents or add new files and create links.

- Click on ‘Submit’.
- If you wish to add more links/documents, navigate to the entry in the Calendar or Folder, use Actions/Edit. You will see a screen like that shown above. Use the relevant button...

- The final result will look like this....

- If you wish to send an notification email to alert selected users that the Meeting pack is ready to view use the SHARE function after you save the pack and have checked that the meeting pack content is correct
If users want to take a 'download' of the pack for offline working then here are the instructions... DOWNLOAD MEETING PACK